Introduction
Last time I built a single Kali workstation on the Mac by hand: install the VM, update it, duplicate it, keep the clone clean. That’s fine when you need one attacker box. It stops being fine the moment you want a target to point it at, and then a second target, and then a clean copy of all of it next week. Clicking through UTM three times and hand-configuring each guest is exactly the kind of work I don’t want to repeat.
So with my DevOps background and being an Infrastructure as Code fanboy, I turned the whole thing into one command.
Challenge
I wanted a small red team range that I could throw away and rebuild without thinking: an attacker box and a couple of deliberately vulnerable targets, all on an isolated lab segment, all reproducible from a file in a repo. And it had to run natively on Apple Silicon, which rules out every x86 VM appliance unless you enjoy watching an emulator crawl.
My constraints:
- Hands-off. One command from nothing to a working lab.
- Reproducible. The lab is defined in code, and not clickopsed.
- Isolated segment.
- The targets and the attacker share a host-only
10.10.10.0/24with no route off it. - Each VM also gets a NAT interface so first boot can install packages; that one reaches the internet (and, being QEMU user-mode networking, my home LAN too), so the lab isn’t air-gapped by default.
- Dropping that NIC after provisioning gets a fully offline target.
- The targets and the attacker share a host-only
- ARM64-native. No emulation tax. Although in all honesty, this might change when we need machines at a later time that are not ARM64. We’ll cross that bridge when we get to it, which is certainly not in this post.
Solution
I abstracted it all behind a make up. That’s the whole interface.
Behind it sits the same three-layer pattern I already use for my Hetzner VPS builds: something provisions the machines, cloud-init bootstraps them on first boot, and Ansible does the actual configuration. The major difference here is the provisioner. Instead of a cloud API, it drives UTM, the free, open-source QEMU front-end for macOS, through its AppleScript interface.
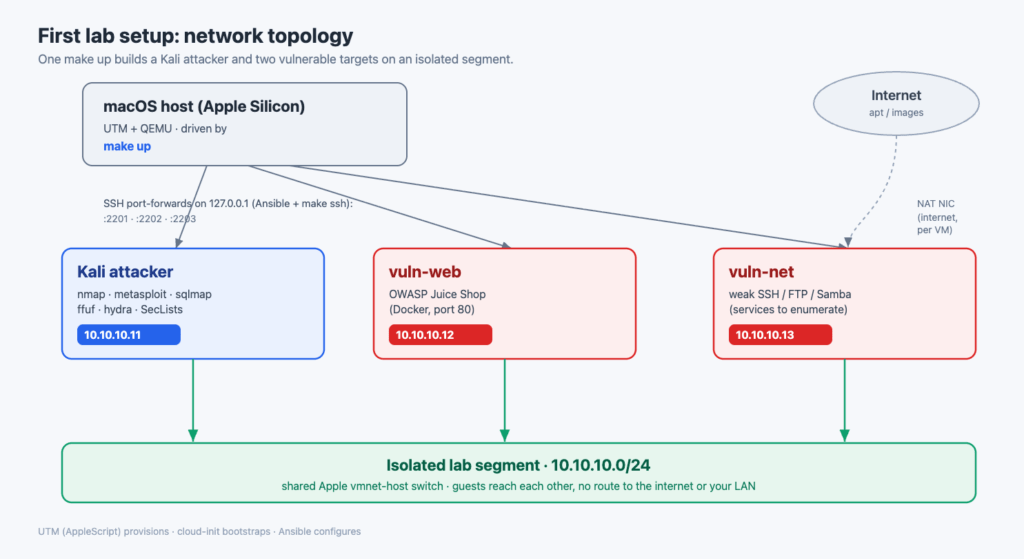
The result is a Kali attacker at 10.10.10.11 and two targets, OWASP Juice Shop at .12 and a weak-services box at .13, sharing an isolated 10.10.10.0/24 segment.
Tech stack
| Layer | Choice | Why |
|---|---|---|
| Host | MacBook, Apple Silicon | That’s what I own |
| Hypervisor | UTM (QEMU) | Free, open source, native ARM64 |
| Provisioning | UTM AppleScript + make | The role a cloud API plays elsewhere |
| Bootstrap | cloud-init NoCloud seed | First-boot user, SSH key, static lab IP |
| Configuration | Ansible | Idempotent roles per machine |
| Attacker | Kali genericcloud ARM64 | Cloud-init support plus the Kali toolset |
| Targets | Ubuntu 24.04 ARM64 cloud image | Boots anywhere, arm64-native |
Key features
- ✅ One command builds three VMs, configured and networked
- ✅ Disposable:
make destroy && make upfor a clean slate - ✅ Isolated lab segment with no route to my home network
- ✅ Everything in a repo, so the lab is code, not clicks
- ✅ ARM64-native from the hypervisor to every guest
How it fits together
Each VM’s position in the fleet deterministically fixes everything about it: its SSH port (2200 + index), its lab IP (10.10.10.{10 + index}), and its MAC addresses. Cloud-init matches each NIC by MAC and assigns the static lab address, so there’s no interface name guessing. Ansible then connects over an SSH port-forward on 127.0.0.1, with no need to discover a guest IP, and applies a role per machine: the Kali toolset on the attacker, Docker plus Juice Shop on one target, and deliberately weak SSH/FTP/Samba on the other.
Adding a fourth machine is a line in a config file and a new Ansible role. That was the entire point.
Three fights with QEMU that took me A LOT of time
The architecture was the easy part. Making UTM’s QEMU actually behave took most of the day, and all three problems were of the kind that produced zero useful error messages.
The VMs booted to a black hole
The first builds hung on boot: both virtual CPUs pinned at ~200%, no network, no SSH, nothing. The same disk image booted fine under a plain qemu-system-aarch64 I ran by hand, which is what finally isolated it. The fault was UTM, not the image. The culprit: UTM attaches a removable drive as a USB CD-ROM, and on its bundled QEMU that USB CD wedges the guest during boot. Attach the cloud-init seed as a plain VirtIO disk instead, one property in the AppleScript, and it boots clean. The seed’s cidata label still gets found; nothing else needed to change.
The guests couldn’t see each other
Both NICs were UTM “emulated” (QEMU user-mode / SLIRP) networking, and it turns out two SLIRP interfaces don’t share a segment: each VM sits on its own private little network. The attacker had 10.10.10.11, the target had 10.10.10.12, and they may as well have been on different continents. The fix was to move the lab NIC to UTM “host” mode, which is Apple’s vmnet-host: a real shared L2 switch, isolated from the internet, that every lab VM joins. ping 10.10.10.12 went from 100% loss to 0% the moment I switched it.
Kali had no screen
With everything working over SSH, the attacker’s UTM window stayed black: “Display output is not active.” The Kali cloud kernel is a minimal build that omits the virtio_gpu driver entirely, so there’s no framebuffer for UTM to draw to. The fix is to install the standard Kali kernel (which includes the driver) and point grub at it. The lesson I paid for here: I first removed the cloud kernel to force the switch, which wedged the boot again. Leaving it installed as a fallback and only changing grub’s default is the version that survives a reboot.
None of these are in any getting started guide. They’re the tax you pay for driving a hypervisor through an automation interface it wasn’t really designed for, and every one of them is now a comment in the code so I never re-learn it.
Results
From nothing to a fully configured 3 machine lab is a single make up and a few minutes, most of it Kali installing tools. From the attacker box, both targets answer:
make ssh attacker
nmap -sV 10.10.10.12 10.10.10.13
# .12 -> 80/http (Juice Shop)
# .13 -> 21/ftp 22/ssh 80/http 445/smb
curl http://10.10.10.12    # HTTP 200, Juice Shop is up
The whole thing tears down and rebuilds on demand, which is the feature I actually wanted: a target I can compromise, break, and reset without it ever costing more than a coffee break.
Of course you can check out the code and documentation here.
Next
The lab exists; now I get to use it. I’ll be adding more machines in later posts, and maybe some walkthroughs how to exploit them.
No blogs for august due to vacation and other obligations. Will be back in September.